Mosquito Blue

The past few days I've been pretty sick with flu like symptoms and have spent much of the day in bed! And I'm NOT joking when I say I'm starting to resemble a troll...swollen nose, nasty hair, you name it. Thank goodness I had all of your amazing blogs to read and keep me occupied! And let me just say that I can't believe how inspired I got by all of your creative ideas....cannot wait to feel better and get back at it! In fact my "must have" and "to do" lists are growing so long I'm thinking I'll make a giant list on the side of my blog just so I can keep my thoughts organized and priorities straight.

While quarantined in our bed, I was going through some of our Mexico pictures from our trip to Playa del Carmen this summer. I came across a couple photos of this GORGEOUS restaurant which I thought you might like to see. The restaurant is called Mosquito Blue. We didn't dine there so I can't give a review on any food...but as far as eye candy goes...this place stopped me dead in my tracks and reaching for our camera.


Love all the white with the pops of colour and contrast!


Cure for Claw Marks

Remember these stools?

Well they were a housewarming gift from Leah and my Dad. Leah and I searched high and low in Edmonton for the perfect cream leather stools I had in mind....finally finding them at Konto furniture store. We literally drove all over town...like I minded...shopping is FUN!

(note to Dad and Leah....if you are reading this....the following sounds worse than it is....)

Well we have had them for just over a year now and we get tons of use out of them....and it seems to be a favorite place for our two cats to sleep. As it turns out sleeping isn't the only thing they like to do on these stools. Sharpening claws seems to be a favorite past time for Kato and Sasuke...and if I didn't love them OH SO MUCH... well you can read between the lines here.

So I purchased a leather repair kit from a local hardware store and that was an ok fix...but for the perfectionist in me it wasn't good enough. I called the manufacturer of the stool and they offered me a replacement at a discounted price. This was a good option, however, I'm afraid the cats will just love some fresh leather even more so I needed another idea....
This is where you realize I am actually nuts  am a little weird. So my next idea came from a place of despiration when I noticed a few more claw marks... and my heart began to sink. I ran out in search of slipcovers and came home with 3 pillow cases to put over the tops of the stools and 3 placemats to put on the seats. It worked but looked rediculous.
So I was searching Etsy for slipcovers and I came across these:

The sellers store is called SimpleLinen. Her slipcovers are just gorgeous but a tad rich for my blood lol! One day I will be able to afford them!
I was starting to trick myself into thinking DIY pillowcase-placemat covers were the new it thing...but then Holly was so kind to share Kim with me (the wonderfully skilled seamstress who made those beautiful wingback chair covers for her). After considering a few different designs, including the ones above (which wouldn't work as well for stools cause the skirt would just get too big by the time it reached the floor), we decided on something completely different. Loose fitting linen covers! Here is the look I'm going for...except I can't decide on the length....long to the floor, almost to the floor, or just like in the photo:

These ones are from Rachel Ashwell

My plan is to eventually have ones made to protect my dining room chairs too...and they will look more like the ones from SimpleLinen. Either the skirt with the pleated corners or the flowy skirt.

In the mean time... the other day I made the long trek out to Ikea and I had no idea but they sell slip covers for their Henriksdal style stools. And at only $15 each I was pretty happy! Finally I can ditch the makeshift pillowcase-placemat combo I had going on!
Here is what they look like for now...not a bad fit. I would go ahead and get the sticky velcro so I could secure the slip covers to the underside of the stools but since they are only temporary I'm just going to leave it.


I got those great little pillows from Ikea too at $15 a pop!

If you guys get a chance can you tell me which length of linen slipcover you think would look best?

The Master Plan

Since the master bathroom and bedroom have been on my mind I decided I would make up some mood boards and get some inspiration ideas together. The picture of the bathroom below honestly has to be one of my favorite inspiration bathrooms of all time. Its elegant, clean, and airy looking but still has elements of comfort like the white worn mirror. I painted our bathroom walls Benjamin Moore Stonington Grey months and months ago. I really love the colour, although, because we have no windows in our master bath, the walls seem to have a bit of a light blue cast to them rather than the true light grey I had hoped for. I already have that light fixture I got with my Mom when she was here visiting one time. And I can also check the shower curtain off my list which I picked up with Holly from Anthropologie a week or so ago....it is just gorgeous! Definitely a splurge for me.
The honed marble tiles I want will also be on the expensive end, but since our master bath is only 28sq.ft it shouldn't be too bad. At least this will be one more project to keep me busy while Nathaniel is gone.

Let There Be Light

My next major project I have planned is going to be my master bedroom! When my Dad shipped out those two burgundy sofas he also sent a HUGE dark wood bedroom set. These pieces are definitely made for a large space...so my objective with this room is going to be to try and make it appear bigger than it is. I might even paint some of the wood bedroom set (don't be mad Dad)...making them look like mismatched pieces rather than a "set". For now I have painted the walls Benjamin Moore Cloud White and am figuring out the lighting situation to keep me satisfied with how it looks until I can do bigger things like rip up the carpets!

BM Cloud White

I'm on the hunt for the perfect (by that I mean cheap AND pretty) crystal chandelier. I want the room to have a beachy-cottage type feel...but I still want some glamorous accents like the chandelier.
The other day I was in Home Sense and spotted two lamps on clearance for $26 each! All because they had completely different style lampshades, the bases were a little different (but I liked that)...and one had a tiny chip in the base. I didn't mind because I was planning on changing them anyway....

Here is what one of them looked like


I painted them a really pretty light gray...you can see the difference in the base of the two lamps here


I usually prefer a drum style lampshade for the most part so I found these two on clearance for $13! They were also mismatched which is okay because I planned on changing this too!


I found 2 meters of burlap for $5 ... the lady at the fabric store thought I was NUTS to recover a lampshade with it!
Sasuke getting bored watching me! He sure loved snuggling up on that burlap!

At first I thought of going for a tight fit and lining the top and bottom to give it a more finished look...but with the relaxed and cozy feel I want for our bedroom I was loving the crinkly looser fit on the shade!

All finished!

I really like the way they look...hopefully I can post pics of the whole room sooner rather than later.

I also wanted to share my tin wall art I also found at Home Sense....they were $6.99 each.
I'm still not entirely sure where I plan on putting these...maybe in our guest bedroom or guest bath


Thank You Holly and Holly's Mom!

Today I had pretty much the best day EVER!!! Holly asked me if I wanted to dig through some of her Mom's vintage jewels to use on my feathered hair pieces! FOR REAL?!?! Yes awesomeness (if that is even a word) must run in their family!
I had so much fun looking through the box full of treasures and drinking delicious caramel tea with them! Thank you BOTH so much!
Here are just a few of my favorites...

I cannot wait to pull out my feathers and see what I can make with these! Finally some truly one of a kind pieces....What fun I'm going to have!

Hollywood Regency

I have always loved elements of so many decor styles and one of those happens to be Hollywood Regency. I tried to mix elements of this style into my living room with the chandelier, coffee table, and white accents. In my first blog post ever, about my living room, I received a pretty big response that I should paint the dresser on which our tv rests. Since that dresser wasn't built to hold very heavy things, it was actually a pain to open the drawers cause they'd just fall off the tracks every time due to all the movies and CDs they held. So in the back of my mind somewhere I was on the lookout for a new furniture piece to replace that one.

A couple weeks ago I went to one of our local thrift stores to search for some vintage jewelry to put on my feather hair pieces I sell. Low and behold I saw this great dresser out of the corner of my eye...I walked over to check it out and saw that it was only $15! SCORE!
Then I realized I had come by myself and have a fairly small SUV. The ladies at the store also mentioned they couldn't help...but I was going to be damned if I couldn't jam this thing into our car!!!
After much heaving and stuffing I finally got this thing all bottled up in our car and headed home to paint! (I'm pretty sure I could do the ship in a bottle thing now).


I decided to go with a creamy white, it has just a hint of greige undertones...
My first instinct was a Hollywood Regency look for this piece.....


But then I thought I'd distress it a little....and I LOVED it...but it wouldn't fit as well with the rest of the living room if I kept it like this.... (like my slippers?)
So I changed it back....and here it is holes filled and painted and looking much prettier!


The reveal!!! And I'm happy to report that this one has very strong drawers that can handle all the weight of our entertainment needs! (photos taken at night....sorry its a little dark)


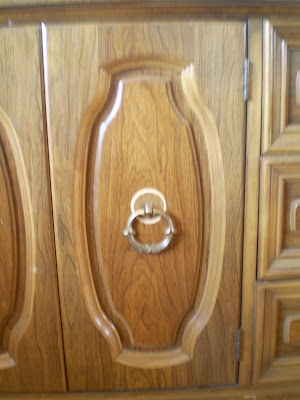
The knobs I chose were actually called Regency Knobs....which I didn't plan....

Nathaniel disagrees with my knob choice...he wanted crystal knobs!!! lol I guess he's more into this stuff than I thought!


Vintage Printable

Last night when I got home from work I convinced Nathaniel to go for a short walk out to the mailbox to see if any mail had arrived. To my excitement my monthly subscription to Canada's Style At Home had come! As I was dozing off reading it in bed I noticed the lovely artwork they had displayed on a photo of an office wall (pg 70 & 71, the decorating high/low feature).


I flipped the page to see if I could find a source for the artwork and I was super excited when I saw that the artwork was 18th century prints from a FREE online source!!!! Yes FREE! You can download those prints featured as well as many more (hundreds) for free at Vintage Printable . They have so many prints to choose from...anything from botanicals to animals, anatomy, astronomy, antique maps and marine life. They also had a cool gallery for Halloween prints and other holidays. Here are a few of my favorites I saw....


this is a 1675 German version of the world map


these are two of the 8 mushroom prints they had featured in Ikea frames in the magazine spread


The site is under maintenance and has a few quirks to sort out but overall I found it to be a great source for some free vintage prints! I actually found the easiest way to navigate the site was to scroll down and on the right is a list of all the galleries.